


This article's conception originated with the cloud resume challenge. We must create a visitor counter-equipped serverless static resume website. We require four serverless services: Azure Cosmos DB for storing the visitor count; Azure Functions for retrieving and updating the visitor count from our store; Azure Storage for hosting our static resume website; and Azure CDN for caching and accelerating the loading of our static website. Finsl result - shubsdev.com.ng
Prerequisites
An Azure account
A Github account
A code editor
Knowledge on html and javascript
Custom domain (optional)
Building the backend - Azure CosmosDB
Steps
From the azure portal search for "Azure Cosmosdb" and click on create
Select Azure CosmosDB for NoSQL and Choose your preferred Azure subscription and resource group. Enter a Globally unique account name, capacity - serverless and leave the remaining options to default.

Click on review + create. Ignore the error above as I had created my cosmosdb account already
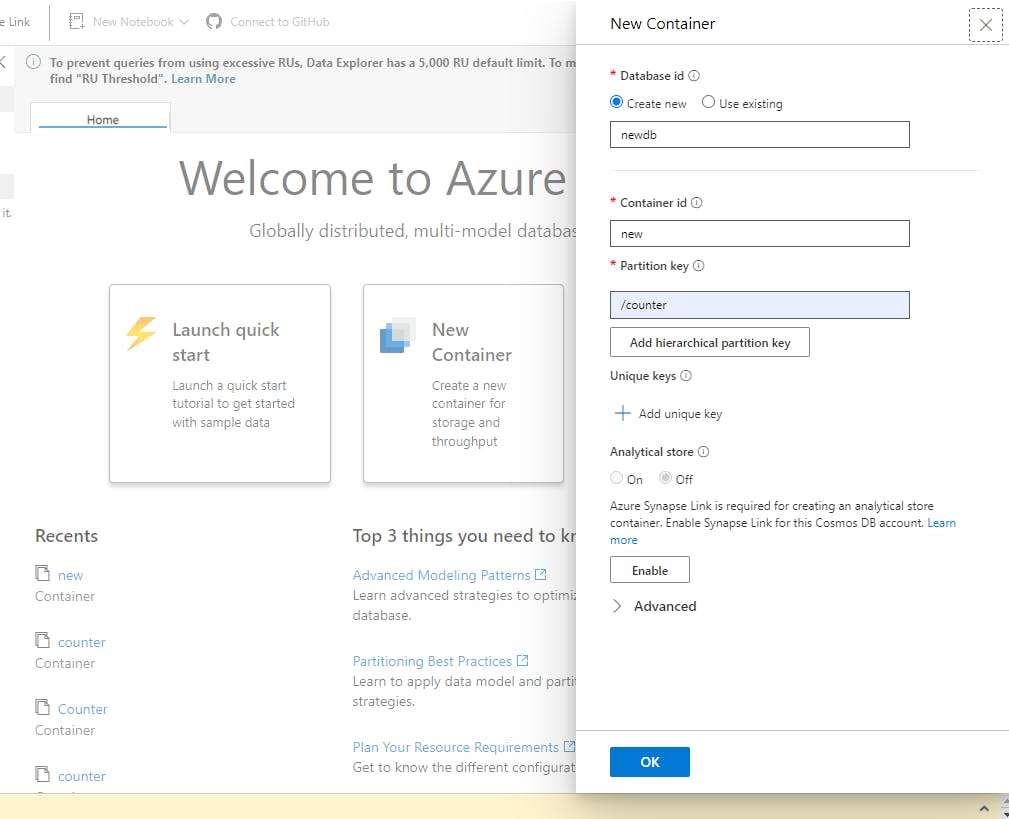
Once the deployment is complete, Select "Go to Resource". On the left pane select "Data Explorer", select "New container", enter a database id, container id and partition key of your choice.
After the DB is created, select the db and then create a new item. Replace the value for id as whatever your like, in my case it is "test". Add a new line "count" as 0. Click save and your cosmosdb is ready to use.

Building the Function - Azure Functions
Steps
From azure portal, search for "Function App" and select it
On the function app page select "create function"
Choose your preferred Azure subscription and resource group. Enter a Globally unique function app name. Select "code" as the option under publish , Select Node.js as runtime stack, leave the rest as default, then select Review + Create.

Once deployment is complete, Select "Go to Resource" and select functions on the resource page.
Click "create" and select "HTTP Trigger" as the template, then go ahead to create the function
Once the function is created, we need to integrate it with our previously create azure cosmos db. To do this click on the newly created function and select "Integration"
Select "add input" to add an integration to get our visitors count for a specific page.
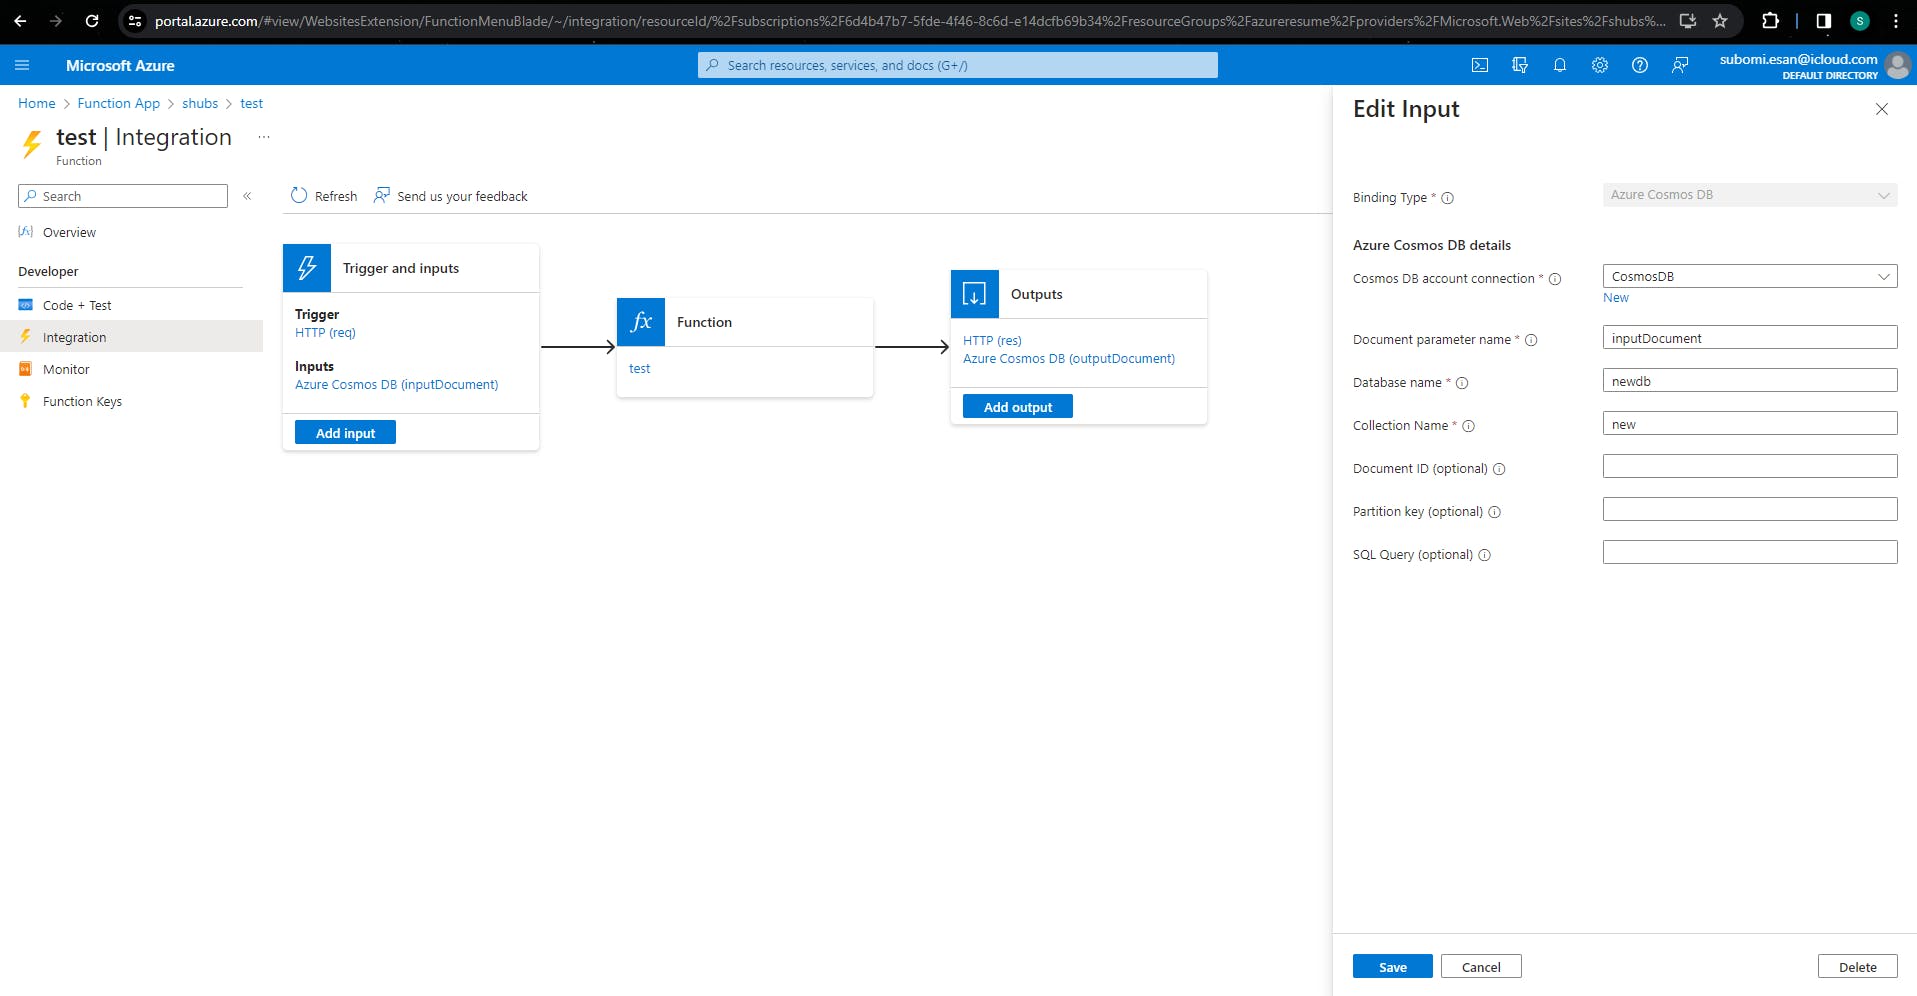
Binding Type is "Azure Cosmos Db", Database name should be the name of our CosmosDB and Collection name should be the name of our Cosmos DB container both created earlier. Create a new Cosmos DB account connection using your created cosmos db account. Once done you can save the input.
Select "Add Output" to add an integration to update our visitors count for a specific page. Binding Type is "Azure Cosmos Db", Database name should be the name of our CosmosDB created earlier and Collection name should be the name of our Cosmos DB container. Select save to create our output integration.

Once done with the integration, we move on to the code for the function. Select "Code + Test" and replace the code with the code below
module.exports = async function (context, req, data) {
  context.bindings.outputDocument = data[0];
  context.bindings.outputDocument.count += 1;
  context.res = {
     body: data[0].count
  };
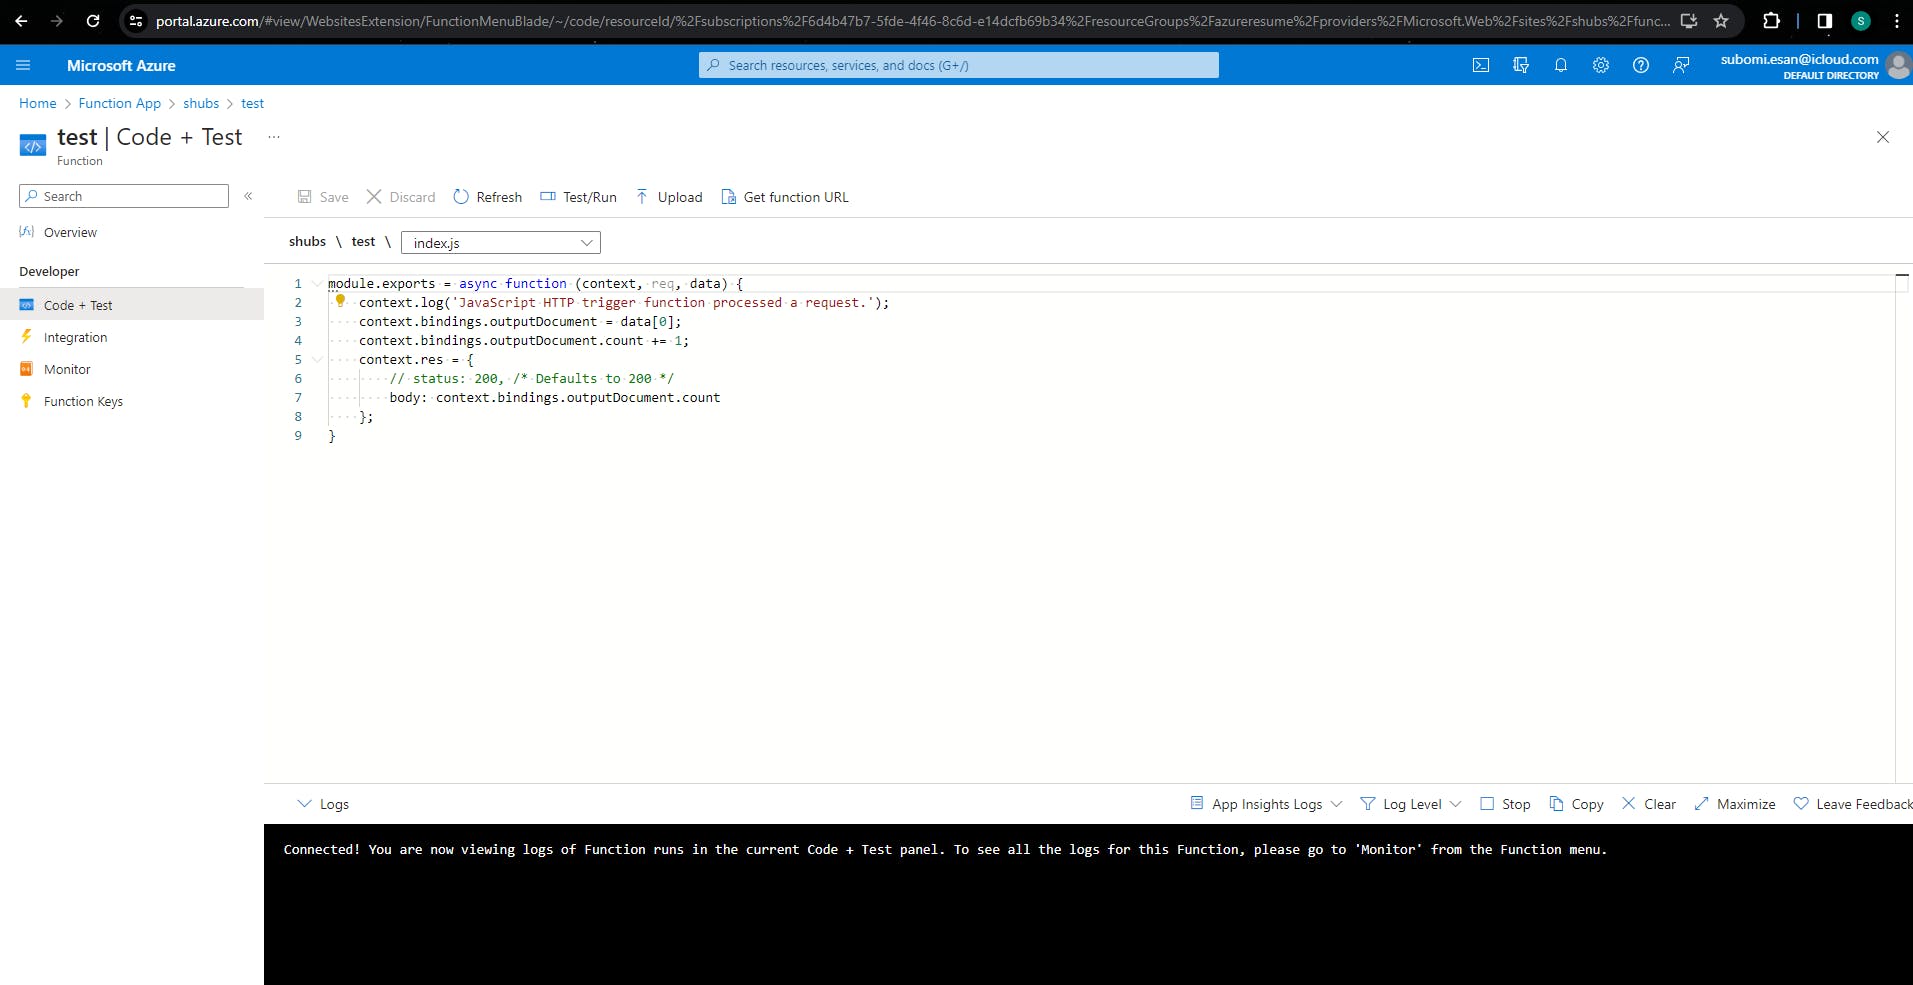
- We can test our function by using the test/run feature. We would make a GET request to our function and query parameter with name of "id" and with a value of in my case "counter". In your case it would be whatever value you gave id in the cosmosdb. Once you get a status code 200 it is working well. If you run into any errors at this point click on monitor and go through the logs under invocations to tell you what is wrong.
Hosting our resume - Azure storage
Steps
For the resume website, it was written in html and css and gotten from a template. I edited this to my taste and added javascript to show the visitor count. The full code can be found on my github.
On the Azure Portal, search for "storage accounts" and select it
On the storage accounts select create
Choose your preferred Azure subscription and resource group. Enter a storage account name that is globally unique. Leave the remaining options as default and select "Review + Create".
Once deployment is complete, select "Go to resource"
Select "Static Website", on the page select enable as it is disabled by default. Enter your resume index page and error page and save. To upload your files go to container and upload to the $web container

Upload your resume files and integrate javascript to ensure your main.js uses the function app api to retrieve the visitor count.
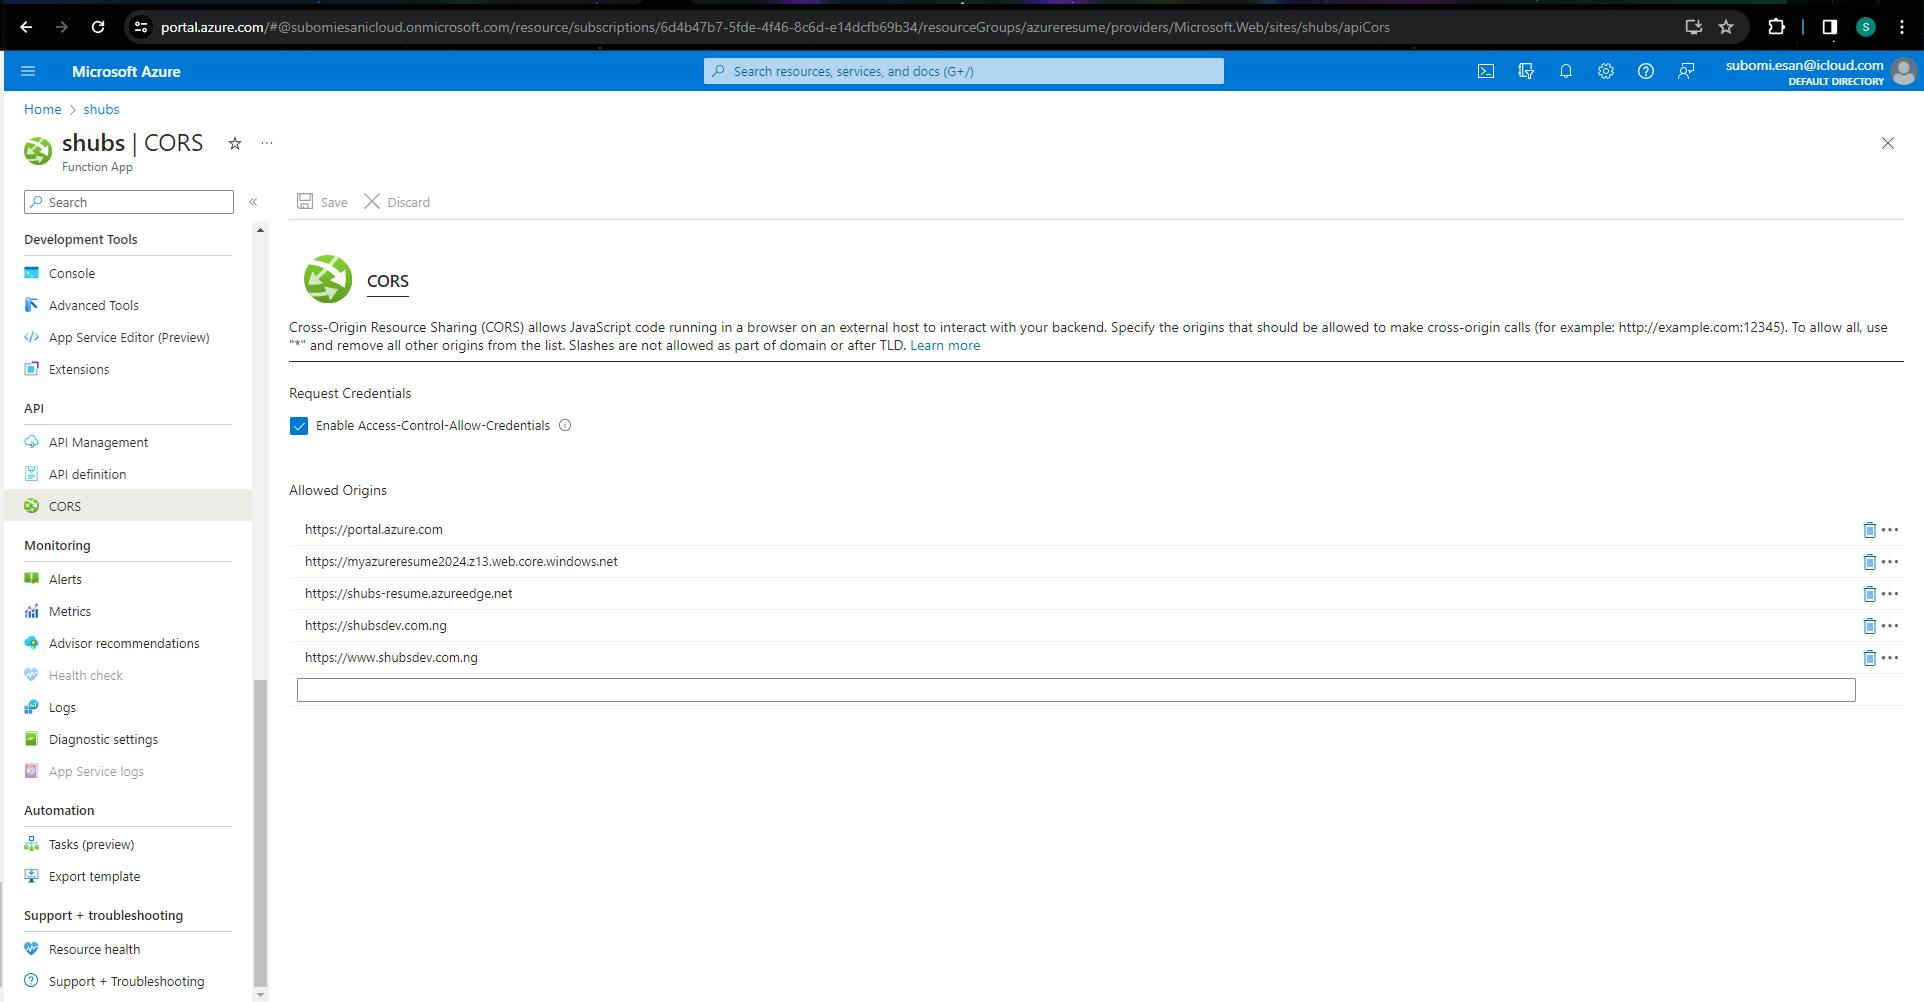
Update your function app to allow request from our static website url via CORS. Go to the function app, click CORS on the left pane, enable "Access-Control-Allow-Credentials" then add the static website url of the storage account to the list of allowed origins
Now that we have the storage account configured we would go ahead and configure Azure CDN to optimize content delivery, point to custom domain and enable https.
Configure Azure CDN
Steps
Go to your storage account and select your storage account for your static website
On the left pane, under security and networking select "Front door and CDN"
Under service type select Azure CDN and create a new profile.
Select the "Standard Microsoft" option for pricing tier. Enter a globally unique name for CDN endpoint name and select the storage account as origin host name. Under Query string caching select Ignore query string. click create and wait for some minutes while it deploys your content to CDN. Don't forget to add your CDN endpoint url to list of allowed origins under CORS in your Function App.

Once this is deployed you can access your website via the cdn endpoint or you can go ahead to configure a custom domain
To configure a custom domain all you need to do is create a cname record on your domain pointing to your cdn endpoint and add it to azure and azure takes care of the rest
CI/CD using Github Actions
Anytime you make changes to the website, the changes should be automatically deployed to our infrastructure, we would use Github actions for that.
In our github we can enable github actions on our repositry to achieve this
Below is sample code to deploy from github to our azure infrastructure. This is also on my github
name: Blob storage website CI

on:
    push:
        branches: [ main ]
    pull_request:
        branches: [ main ]
jobs:
  build:
    runs-on: ubuntu-latest
    steps:
    - uses: actions/checkout@v3
    - uses: azure/login@v1
      with:
          creds: ${{ secrets.AZURE_CREDENTIALS }}

    - name: Upload to blob storage
      uses: azure/CLI@v1
      with:
        inlineScript: |
            az storage blob upload-batch --account-name myazureresume2024 --auth-mode key -d '$web' -s . --overwrite
    - name: Purge CDN endpoint
      uses: azure/CLI@v1
      with:
        inlineScript: |
           az cdn endpoint purge --content-paths  "/*" --profile-name tutorial --name shubs-resume --resource-group azureresume

  # Azure logout
    - name: logout
      run: |
            az logout
Resources
Front-end resources The front-end is a static site with HTML, CSS, and JavaScript. The visitor counter data is via an Azure Function API call.
- How to make an API call with JavaScript and in a simple way how to use it to make an API call https://www.digitalocean.com/communit...
- Azure storage explorer is a handy tool to use when working with Storage Accounts https://azure.microsoft.com/en-us/fea...
- How to deploy to blog storage https://docs.microsoft.com/en-us/azur... Back-end resources
The back-end is an HTTP triggered Azure Functions with Cosmos DB input and output binding. The Function is triggered, it retrieves the CosmosDB item, add +1 to it, and saves it and returns its value to the caller.
- HTTP triggered Azure Functions https://docs.microsoft.com/en-us/azur...
- Prerequisites for developing functions with visual code locally https://docs.microsoft.com/en-us/azur...
- Create a Cosmos DB account via command line https://azure.microsoft.com/en-us/res...
- Create a Cosmos DB account via the portal https://docs.microsoft.com/en-us/azur...
- Create an HTTP triggered Azure Function in Visual Studio Code https://docs.microsoft.com/en-us/azur...
- Azure Functions Cosmos DB bindings https://docs.microsoft.com/en-us/azur... - Retrieve a Cosmos DB item with Functions binding https://docs.microsoft.com/en-us/azur...
- Write to a Cosmos DB item with Functions binding https://docs.microsoft.com/en-us/azur...
- You'll have to enable CORS with Azure Functions locally and once it's deployed to Azure for you website to be able to call it https://github.com/Azure/azure-functi... https://docs.microsoft.com/en-us/azur...